Ultrasonic Sounder with Display
A family member had a weight on a stretchy cord and needed to know how
close to the ground it came at its lowest point. They were going to be
doing this many times to dial in the starchiness over different
weights. The plan was to take a video and use that to find the
distance. While this would work, it seemed like something that
I could over-engineer could be improved with a home electronics
project. (They didn't end up using my device, but I had a good time
making it.) Here's that story.
So, the idea is to have something that could
- measure distance accurately and fairly quickly,
- display that distance
- be used while focusing on something else
- didn't need a laptop
Here's what I came up with:
Connecting the Pieces
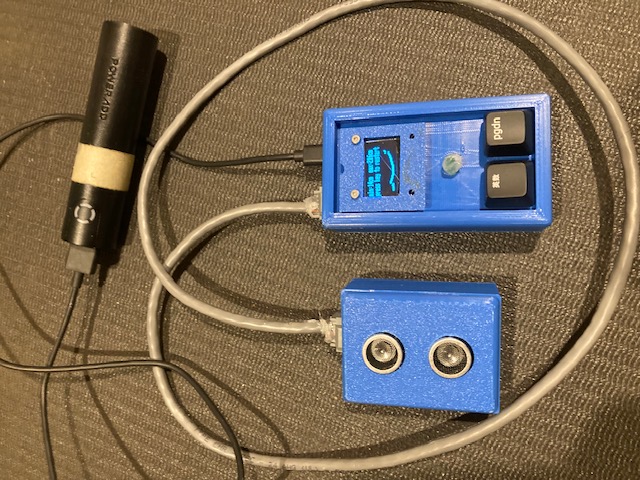
The above image has 3 pieces:
- a black battery, of whilch I will say no more
- the "sounder" on the left with two round speakers/sensors
- the "controller" on the right with a display, 2 buttons, and an LED.
My thought was that the sounder might get squashed if I wasn't careful and I wanted to be able to read the display from a bit of a distance. I ended up using some phone jacks (RJ-11) to separate the parts. I think that worked well.
Parts
It turns out that an SSD-1306 display (0.96" monochrome OLED with a resolution of 128x64) and an Ultrasonic distance sensor, HC-SR04 can both be procured without breaking the bank. (I spend ~$6 to get both.) They're both supported by circutipython on the Raspberry Pi Pico.
Side Note: many of the "data sheets" about the HC-SR04 don't mention the delay required between measurements, which is needed to avoid false echos from earlier measurements. The digikey notes linked above suggest at last a 60ms measurement cycle.
I used keyboard switches and keycaps that I had lying around.
You can cut to the chase and see the 3d-printer files and python at my sounder github repo.
Initial Success
When the hardware arrived, I attached the HC-SR04 to my pico and started to experiment. There are a number of tutorials out there showing how to hook things up and measure one distance. They all had mostly the same code and I got the early example to work without much problem. Fortunately, I needed a few more features, so I had to write some new code myself.
My plan was to take many measurements over a few seconds. I could then look at the values and find the lowest value. No problem, I'll just take 20 measurements in a loop and print out the results.
Ha!
Debugging multiple measurements
Measuring worked fine for 1,2,3,4,5, and 6 measurements, but as soon as I tried to take the 7th in a row everything would hang. Forever.
After some head scratching and some exploratory testing, I had an idea that was actually correct. After it's been triggered, the distance sensor sets its Echo pin high and keeps it high for a time proportional to the distance measured. For things far away Echo stays high longer, and for closer it's not held high as long.
My code:
- pulsed the HC-SR04's trigger pin
- waited for Echo to become high, (A in the code below) note the time, and then
- looped again, waiting for Echo to go low (B below) and note when that happened
- Calculated the distance and printed it out
    for x in range:
        trigger.value = True
        time.sleep(USEC_15) # trigger needs to be on for at least 10us
        trigger.value = False
A       while not self.echo.value:
            echo_on = time.monotonic_ns()
        # now we wait for it to fall, updating until it stops.
B       while self.echo.value:
            echo_off = time.monotonic_ns()

C       cm = ((echo_off - echo_on) * CM_PER_NS) / 2) + 0.5
        print(f"measured: {cm}cm")
The difference between the two times, echo_on and echo_off, would
be used to calculate the distance.
My hypothesis was the the garbage collector (gc) was kicking off around the time of the first sleep, before A. This made the code effectively blind to any changes to the echo pin until the gc completed. By the time the code was running again we'd completely missed the echo pulse. We were stuck in A, waiting for a high signal that was never coming.
Quitting from the console showed that I was in fact hung in the first while loop.
Here's a diagram of what was going on.

To avoid this issue I bracketed the distance measuring code with
gc.disable() and gc.enable(). Things were surely going to work
now. Ha! again.
The new code looked something like this:
        self.trigger_ping()
        gc.disable()
        # measure...
        gc.enable()
        return ...
This time I ended up with a really inscrutable and fatal error. After
additionally scratching I tried adding a gc.collect() right after the
gc.enable().
        self.trigger_ping()
        gc.disable()
        # measure...
        gc.enable()
        gc.collect() # critical to keep running
        return ...
Success! I don't understand how the gc decides to run, but apparently
the only time it wanted to run was during that loop. Even though I
was sleeping in other places in the code, the gc wasn't running
then. Printing out gc.mem_free() was helpful in seeing that this was
really the problem. (Each loop iteration showed a smaller number, until
things broke.)
Folks might say that doing a gc.collect() every time isn't very
efficient. While that maybe the case sometimes, as noted above, we need to wait
at least 60ms between sending pulses, so we're not wanting for CPU
cycles.
My initial attempts did a time.sleep() for the full 60ms, but after
some though it was clear that we just need a total of 60ms from the
last echo, so the current code is adaptive, and only sleeps long
enough to give us that 60ms delay. This allows us to get more
measurements than the naive implementation.
Controlling and Displaying Measurements
You'll notice there are two buttons on the controller, below the LED and screen. One is essentially <enter> while the other toggles the measurement type: one or many. Displaying one measurement is straightforward, but I'm proud of the many display. Here's a close-up of a many display:
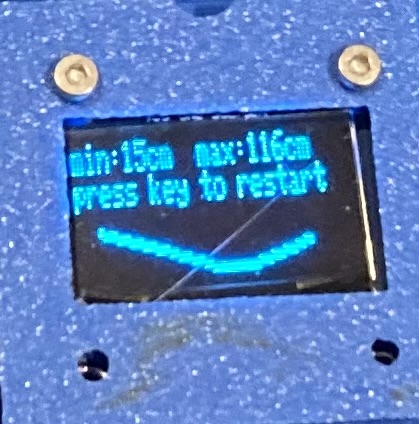
The min and max measurements speak for themselves, as does the message. The little "smile" below thrills me.
While we're only showing values for two of the measurements: min and max, and don't have enough display resolution to do a proper graph, the dots below show the general distance measured.
In every case the display will use the same height for its graph, whether min and max differ by 10 or by 100 doesn't matter. We can see that the measurements started out "far away," came closer, than then went away again, but not as far as the initial measurement. I think it's a nice way to see what got measured and give you some insight into the measurements, particularly when paired with min and max values.
There's also an LED, which blinks to count down to a delayed start, allowing you to trigger the measurement and then move to actuate your contraption.
Schematic
Here's a schematic for the whole thing.

Let me know if you make one.